前言:本来上一篇教程是最后一篇的了,不过考虑到替换wince.nls时没有冲突地址,这样与实际的XIP移植还有一点不同的步骤,再加上前段时间移植20757的XIP时有了不少心得,因此再写一篇教程与大家分享一下心得吧。还是那句话,新手上路,有错误之处请大家指正,谢谢~
开始吧~
一、一般XIP的目录结构如图
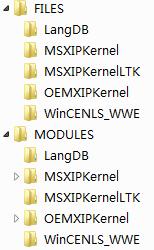
其中MSXIP开头的目录是各种机型通用的驱动部分(微软XIP,呵呵),其中OEM开关的目录是该机型专用的驱动,而WINCE目录则是放wince.nls的,langdb目录我也不知道是什么……(里面没什么文件的,不管它),因此移植XIP,其实就是替换XIP里面MSXIP开头的目录里的文件。
二、首先提取出touch pro 19971和HD 20764的XIP(过程略,请翻看其他教程,我会在附件里附上这两个XIP),然后使用XIPPort.exe将这两个XIP dump下来
1、首先将19971的XIP与XIPPort.exe放在同一个目录,xip的文件名为xip.bin,如果是其他文件名请重命令。然后运行xipport.exe
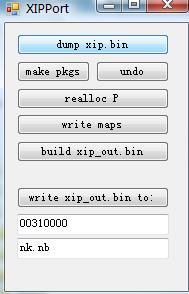
(1)点击dump xip.bin,将xip.bin解开来,此时会出现一个OUT目录
(2)再点击write maps,将模块地址都写在map.txt里
(3)最后点击make pkgs,将OUT里面的文件分类整理成各个目录
2、然后将OUT目录改名成OUT19971吧,以便记忆
3、同上dump出20764的XIP,然后改名成OUT20764目录
三、将OUT19971复制一份,改名为OUT目录
四、将OUT20764里MSXIP开头的目录里的文件全部复制替换OUT里的相应目录文件,使用Beyond Compare比较方便,当然手工复制粘贴也是一样的。
五、这样就移植的这一步就做完了,接下来主要是看看有什么地址冲突及解决的方法
六、接着我们用xipport看看有什么错误吧
七、先点击undo,将那些目录重新还原成开始状态,再点击realloc p,有些机型会弹出四个error!unknown o32 region flags的错误窗口,这个是不要紧的,点击确定关掉就可以了
八、不出所科出现了not enough space错误,这是因为一般高核心的文件比低核心的要大,因此空间不足了,我们先将空间改大些吧,先点击继续或退出吧。
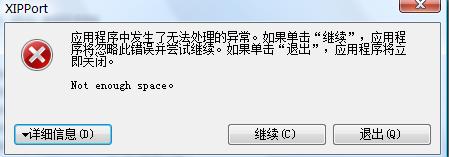
九、打开OUT目录里的ROMHDR.txt,可以看到如下:
dllfirst: D=01F801FC
dlllast: 02000000
physfirst: P=80000000
physlast: 80477E8C
nummods: (00000000)
ulRAMStart: R=80478000
ulRAMFree: 80517000
ulRAMEnd: 83400000
ulCopyEntries: (00000000)
ulCopyOffset: P+001E5FAC
十、我们将physlast、ulramstart、ulramfree都加大100000吧
dllfirst: D=01F801FC
dlllast: 02000000
physfirst: P=80000000
physlast: 80577E8C
nummods: (00000000)
ulRAMStart: R=80578000
ulRAMFree: 80617000
ulRAMEnd: 83400000
ulCopyEntries: (00000000)
ulCopyOffset: P+001E5FAC
十一、保存退出,再打开xipport(如果刚才是点击继续就不必重新打开),再次点击realloc p,这次没有空间不足的错误了,稍等一会儿再按write maps将新排列出的地址写进map.txt里吧
十二、如果first DLL address里的模块地址有重复的话,xipport有可能在点击write maps里提示有重要地址而不能写入map.txt,这时最好利用其他软件修改重复的地址(如用XIPAddrTools),这里我们并write maps并不报错,因此我们就跳过这一步吧
十三、我们看看maps有没有冲突的部分(移植没有冲突简直要比中头奖还要幸运,呵呵),打开maps.txt,搜索!!!!,我们可以看到有三个冲突部分,从第一部分开始看起吧:
02000000 – 02000000 L00000000 End: last DLL address
02000000 – 03db2000 L01db2000 NUL
03db2000 – 03dbb000 L00009000 Virtual base address of wce_rex.DLL
03dbb000 – 03dc2000 L00007000 Virtual base address of smem.dll
03dc2000 – 03dc9000 L00007000 Virtual base address of relfsd.dll
03dc9000 – 03dce000 L00005000 Virtual base address of MMMAP.dll
03dce000 – 03dd5000 L00007000 Virtual base address of htcfsfilter.DLL
03dd5000 – 03dda000 L00005000 Virtual base address of GxDMA.dll
03dda000 – 03dfa000 L00020000 Virtual base address of FLASHDRV.DLL
03dfa000 – 03e4a000 L00050000 Virtual base address of DDI.dll
03e4a000 – 03e51000 L00007000 Virtual base address of ceddk.dll
03e51000 – 03e55000 L00004000 Virtual base address of cecompr.dll
03e53000 – 03e55000 L00002000 !!!!!!!!!!!!!!!!!!
03e53000 – 03e57000 L00004000 Virtual base address of regenum.dll
03e57000 – 03e66000 L0000f000 Virtual base address of pm.dll
03e66000 – 03e6e000 L00008000 Virtual base address of mspart.dll
03e6e000 – 03e7e000 L00010000 Virtual base address of mencfilt.dll
03e7e000 – 03e8a000 L0000c000 Virtual base address of imgfs.dll
03e8a000 – 03e94000 L0000a000 Virtual base address of fsreplxfilt.dll
03e94000 – 03eaa000 L00016000 Virtual base address of fsdmgr.dll
03eaa000 – 03eb3000 L00009000 Virtual base address of fatutil.dll
03eb3000 – 03ec6000 L00013000 Virtual base address of fatfsd.dll
03ec6000 – 03ecc000 L00006000 Virtual base address of diskcache.dll
03ecc000 – 03ed8000 L0000c000 Virtual base address of devmgr.dll
03ed8000 – 03f4a000 L00072000 Virtual base address of crypt32.dll
03f4a000 – 03fe1000 L00097000 Virtual base address of coredll.dll
03fe1000 – 03fef000 L0000e000 Virtual base address of certmod.dll
03fef000 – 03ffa000 L0000b000 Virtual base address of cachefilt.dll
03ffa000 – 04000000 L00006000 Virtual base address of busenum.dll
04000000 – 80000000 L7c000000 NUL
1、我们可以看到冲突的地方:
03e51000 – 03e55000 L00004000 Virtual base address of cecompr.dll
03e53000 – 03e55000 L00002000 !!!!!!!!!!!!!!!!!!
03e53000 – 03e57000 L00004000 Virtual base address of regenum.dll
2、第一行是指cecompr.dll的地址是由03e51000至03e55000,其中长度是4000
第二行的感叹号提示有冲突了,冲突地址是03e53000到03e55000,其中有2000长度的地址是重复了
第三行是regenum.dll的地址,由03e53000到03e57000,长度是4000
3、可以看到,正常时应该是一个地址接着一个地址的,cecompr.dll的结束地址是03e55000,那应该下个文件的地址的起始地址至少是03e55000才可以,但regenum.dll的起始地址是03e53000,提前了2000,因此这里就有2000长度的地址是重复使用了,造成冲突,因此我们要解决这个冲突才可以
4、解决冲突的方法很简单,只要将冲突的文件移到其他空余的地址里就可以了,这里有三种方案:
(1)一是将regenum.dll移到最前面去,我们可以看到最前面是:
02000000 – 03db2000 L01db2000 NUL
03db2000 – 03dbb000 L00009000 Virtual base address of wce_rex.DLL
第一行的意思是从02000000到03db2000有1db2000的空余(未使用)地址,第二行是wce_rex.DLL的起始地址03db2000到03dbb000
因此我们可以将regenum.dll移到wce_rex.DLL的前面。因为regenum.dll的长度是4000,因此将wce_rex.DLL的起始地址03db2000-4000就是regenum.dll的起始地址,3db2000-4000=3DAE000,我们只要将regenum.dll的地址修改成3DAE000就解决这个冲突了,具体修改方法等下再说,我们先看看其他的解决方案
(2)第二个解决方案是将regenum.dll移到busenum.dll的后面,即移到04000000
(3)第三个解决方案是,保持文件的排列顺序不变,将前面的DLL的地址全部往上移动。我们刚才已经说了有2000地址是重复造成冲突了,因此我们可以由第一个DLL(wce_rex.DLL)开始将地址向前移动2000,一直到冲突的地方为止。这个看上去最完美,因为中间没有空出的地址,这里我们就用这个方案吧。(一、二方案简单些,同样是可以成功的)
十四、首先将wce_rex.DLL向前移2000地址,即把起始地址03db2000改成03db0000,这里有一点是要注意的,这里一定要用mreloc.exe修改,而不能直接用WINHEX修改。之前我没留意,结果这里死了好多次,呵呵。
1、打开mreloc.exe
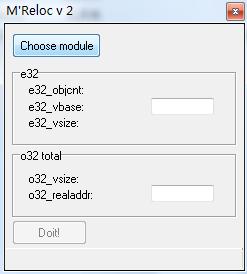
2、点击choose module,选择OUT目录里的wce_rex.DLL
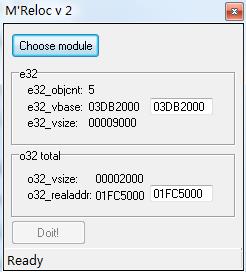
3、将上面的03D32000修改成03D30000,然后点击Doit!
4、进入OUT里的wce_rex.DLL目录,打开imageinfo.txt,可以看到前面几行是这样的:
Module name: wce_rex.DLL
e32_objcnt: 00000005
e32_imageflags: 0000212E
e32_entryrva: 00003684
e32_vbase: V=03DB2000
e32_subsysmajor: 00000005
5、我们将V=03DB2000改成V=03DB0000,然后保存退出,这样这个DLL就修改完毕
十五、如上方法将regenum.dll前面的DLL都往上移动2000地址吧,然后我们再用xipport.exe realloc p一次,再write maps,再打开maps.txt看一下
十六、这里已经完美了:
02000000 – 03db0000 L01db0000 NUL
03db0000 – 03db9000 L00009000 Virtual base address of wce_rex.DLL
03db9000 – 03dc0000 L00007000 Virtual base address of smem.dll
03dc0000 – 03dc7000 L00007000 Virtual base address of relfsd.dll
03dc7000 – 03dcc000 L00005000 Virtual base address of MMMAP.dll
03dcc000 – 03dd3000 L00007000 Virtual base address of htcfsfilter.DLL
03dd3000 – 03dd8000 L00005000 Virtual base address of GxDMA.dll
03dd8000 – 03df8000 L00020000 Virtual base address of FLASHDRV.DLL
03df8000 – 03e48000 L00050000 Virtual base address of DDI.dll
03e48000 – 03e4f000 L00007000 Virtual base address of ceddk.dll
03e4f000 – 03e53000 L00004000 Virtual base address of cecompr.dll
03e53000 – 03e57000 L00004000 Virtual base address of regenum.dll
03e57000 – 03e66000 L0000f000 Virtual base address of pm.dll
03e66000 – 03e6e000 L00008000 Virtual base address of mspart.dll
03e6e000 – 03e7e000 L00010000 Virtual base address of mencfilt.dll
03e7e000 – 03e8a000 L0000c000 Virtual base address of imgfs.dll
03e8a000 – 03e94000 L0000a000 Virtual base address of fsreplxfilt.dll
03e94000 – 03eaa000 L00016000 Virtual base address of fsdmgr.dll
03eaa000 – 03eb3000 L00009000 Virtual base address of fatutil.dll
03eb3000 – 03ec6000 L00013000 Virtual base address of fatfsd.dll
03ec6000 – 03ecc000 L00006000 Virtual base address of diskcache.dll
03ecc000 – 03ed8000 L0000c000 Virtual base address of devmgr.dll
03ed8000 – 03f4a000 L00072000 Virtual base address of crypt32.dll
03f4a000 – 03fe1000 L00097000 Virtual base address of coredll.dll
03fe1000 – 03fef000 L0000e000 Virtual base address of certmod.dll
03fef000 – 03ffa000 L0000b000 Virtual base address of cachefilt.dll
03ffa000 – 04000000 L00006000 Virtual base address of busenum.dll
04000000 – 80000000 L7c000000 NUL
十七、我们继续搜索!!!吧,可以发现这里有两处!!!:
80000000 – 80000000 L00000000 Start: first physical address
80000000 – 80001000 L00001000 RomLDR.PARTHDR
80001000 – 8007d5f4 L0007c5f4 o32 region_0 rva=00001000 vsize=0007c5f4 real=80001000 psize=0007c5f4 f=60000020 for nk.exe
80074000 – 8007d5f4 L000095f4 !!!!!!!!!!!!!!!!!!
80074000 – 8007595d L0000195d o32 region_0 rva=00001000 vsize=0000195d real=80074000 psize=00001960 f=60000020 for hd.dll
8007595d – 80076000 L000006a3 NUL
80076000 – 800760a0 L000000a0 o32 region_2 rva=00003000 vsize=000000a0 real=80076000 psize=000000a0 f=40000040 for hd.dll
800760a0 – 80078000 L00001f60 NUL
80078000 – 800816e4 L000096e4 o32 region_0 rva=00001000 vsize=000096e4 real=80078000 psize=000096e4 f=60000020 for osaxst0.dll
8007e000 – 800816e4 L000036e4 !!!!!!!!!!!!!!!!!!
8007e000 – 80081238 L00003238 o32 region_3 rva=0007e000 vsize=00003238 real=8007e000 psize=00003238 f=40000040 for nk.exe
80081238 – 80082000 L00000dc8 NUL
80082000 – 800822e8 L000002e8 o32 region_2 rva=0000b000 vsize=000002e8 real=80082000 psize=000002e8 f=40000040 for osaxst0.dll
800822e8 – 80093000 L00010d18 NUL
80093000 – 8009d775 L0000a775 o32 region_0 rva=00001000 vsize=0000a775 real=80093000 psize=0000a778 f=60000020 for kd.dll
8009d775 – 8009e000 L0000088b NUL
8009e000 – 8009e398 L00000398 o32 region_2 rva=0000c000 vsize=00000398 real=8009e000 psize=00000398 f=40000040 for kd.dll
8009e398 – 800a0000 L00001c68 NUL
800a0000 – 800a2ee4 L00002ee4 o32 region_0 rva=00001000 vsize=00002ee4 real=800a0000 psize=00002ee4 f=60000020 for osaxst1.dll
800a2ee4 – 800a3000 L0000011c NUL
800a3000 – 800a3148 L00000148 o32 region_2 rva=00004000 vsize=00000148 real=800a3000 psize=00000148 f=40000040 for osaxst1.dll
800a3148 – 800a4000 L00000eb8 NUL
800a4000 – 800a696d L0000296d o32 region_0 rva=00001000 vsize=0000296d real=03ffb000 psize=00002970 f=60000020 for busenum.dll
800a6970 – 800a6f70 L00000600 o32 region_1 rva=00003000 vsize=00000954 real=803bf000 psize=00000600 f=c0000040 for hd.dll
十八、这里我们可以发现nk.exe o32 region_0的结束地址是8007d5f4,但在8007d5f4之前却有三个地址重复了……这里我们发现是hd.dll、osaxst0.dll冲突了,这两个DLL及osaxst1、kd.dll等大家可以发现有很多人都直接删掉,这两个DLL有什么用呢?我问过老麦,老麦说是内部debug用的,一般用户是用不上的,直接删去无影响,而且删去处理冲突就简单多了。不过既然官方有这些DLL存在,我还是喜欢保留的,因此这里我就不删了,我们要将这里的冲突处理一下吧。
十九、Start: first physical address这里的修改,我们修改imageinfo.txt及用WINHEX修改imageinfo.bin就可以了(经我的试验,其实只需修改imageinfo.txt也可正常启动的,不过我们还是修改一下imageinfo.bin吧),我们可以看到每个DLL的后面都会有个空余地址段,我们打开19971的MAP看看这里是怎样的吧:
80000000 – 80000000 L00000000 Start: first physical address
80000000 – 80001000 L00001000 RomLDR.PARTHDR
80001000 – 8007d5f4 L0007c5f4 o32 region_0 rva=00001000 vsize=0007c5f4 real=80001000 psize=0007c5f4 f=60000020 for nk.exe
8007d5f4 – 8007e000 L00000a0c NUL
8007e000 – 80081238 L00003238 o32 region_3 rva=0007e000 vsize=00003238 real=8007e000 psize=00003238 f=40000040 for nk.exe
80081238 – 80083000 L00001dc8 NUL
80083000 – 8008495d L0000195d o32 region_0 rva=00001000 vsize=0000195d real=80083000 psize=00001960 f=60000020 for hd.dll
8008495d – 80085000 L000006a3 NUL
80085000 – 800850a0 L000000a0 o32 region_2 rva=00003000 vsize=000000a0 real=80085000 psize=000000a0 f=40000040 for hd.dll
800850a0 – 80087000 L00001f60 NUL
80087000 – 800906e4 L000096e4 o32 region_0 rva=00001000 vsize=000096e4 real=80087000 psize=000096e4 f=60000020 for osaxst0.dll
800906e4 – 80091000 L0000091c NUL
80091000 – 800912e8 L000002e8 o32 region_2 rva=0000b000 vsize=000002e8 real=80091000 psize=000002e8 f=40000040 for osaxst0.dll
800912e8 – 80093000 L00001d18 NUL
80093000 – 8009d775 L0000a775 o32 region_0 rva=00001000 vsize=0000a775 real=80093000 psize=0000a778 f=60000020 for kd.dll
8009d775 – 8009e000 L0000088b NUL
8009e000 – 8009e398 L00000398 o32 region_2 rva=0000c000 vsize=00000398 real=8009e000 psize=00000398 f=40000040 for kd.dll
8009e398 – 800a0000 L00001c68 NUL
800a0000 – 800a2ee4 L00002ee4 o32 region_0 rva=00001000 vsize=00002ee4 real=800a0000 psize=00002ee4 f=60000020 for osaxst1.dll
800a2ee4 – 800a3000 L0000011c NUL
800a3000 – 800a3148 L00000148 o32 region_2 rva=00004000 vsize=00000148 real=800a3000 psize=00000148 f=40000040 for osaxst1.dll
800a3148 – 800a4000 L00000eb8 NUL
800a4000 – 800a696d L0000296d o32 region_0 rva=00001000 vsize=0000296d real=03ffb000 psize=00002970 f=60000020 for busenum.dll
800a6970 – 800a6f70 L00000600 o32 region_1 rva=00003000 vsize=00000954 real=80478000 psize=00000600 f=c0000040 for hd.dll
1、可以看到每个模块的起始地址都是XXXXX000,而每个模块至少间隔2000以上的地址。
2、虽然不清楚官方MAP这里为什么这样处理,不过我们还是尽量按照官方的方式来处理吧(事实我也试过直接将模块地址连接起来不留空位,也可以正常使用的,不过还是按官方风格处理吧)
二十、继续刚才的冲突处理,可以看到两个NK地址是接着的,因此我们将两个NK之间的模块移到第二个NK地址之下吧
1、看看这行:8007e000 – 80081238 L00003238 o32 region_3 rva=0007e000 vsize=00003238 real=8007e000 psize=00003238 f=40000040 for nk.exe
照刚才的推论,接着这个模块的地址应该是80082000才对,我们按原顺序放吧,放hd.dll o32 region_0的,这个的大小是195d,少于2000,因此下个模块开始地址就是80084000,这个就到hd.dll o32 region_2了,我们打开hd.dll目录里imageinfo.txt,可以看到如下:
o32[0].o32_vsize: 0000195D
o32[0].o32_rva: 00001000
o32[0].o32_psize: 00001960
o32[0].o32_dataptr: P+00074000
o32[0].o32_realaddr: P+00074000
o32[0].o32_flags: 60000020
o32[1].o32_vsize: 00000954
o32[1].o32_rva: 00003000
o32[1].o32_psize: 00000600
o32[1].o32_dataptr: P+000A6970
o32[1].o32_realaddr: P+003BF000
o32[1].o32_flags: C0000040
o32[2].o32_vsize: 000000A0
o32[2].o32_rva: 00003000
o32[2].o32_psize: 000000A0
o32[2].o32_dataptr: P+00076000
o32[2].o32_realaddr: P+00076000
o32[2].o32_flags: 40000040
(1)region_0代表o32[0].o32,region_2代表o32[2].o32,我们可以看到o32[0].o32_dataptr和o32[0].o32_realaddr都是P+00074000,这里有两个相同的地址我们应该改哪个呢?还是以官方为准,我们可以打开其他DLL的imageinfo.txt看看,这两个数值那几个DLL都是一样的,所以这里我们应该两个地方都要修改(希望有人能告诉为什么……)
(2)我们可以看到P+00074000,而这个P是代表physfirst,而我们通过ROMHDR.txt可以看到P=80000000,因此这里原本的地址是P+74000=80000000+74000=80074000,这个地址符合map.txt里的hd.dll的o32 region_0,而我们要修改成80082000,因此=地址-P=80082000-80000000=82000,因此我们把P+00074000改成P+00082000即可
(3)同理下面的o32[2].o32_dataptr和o32[2].o32_realaddr把P+00076000改成P+00084000
(4)改完后的imageinfo.txt如下:
o32[0].o32_vsize: 0000195D
o32[0].o32_rva: 00001000
o32[0].o32_psize: 00001960
o32[0].o32_dataptr: P+00082000
o32[0].o32_realaddr: P+00082000
o32[0].o32_flags: 60000020
o32[1].o32_vsize: 00000954
o32[1].o32_rva: 00003000
o32[1].o32_psize: 00000600
o32[1].o32_dataptr: P+000A6970
o32[1].o32_realaddr: P+003BF000
o32[1].o32_flags: C0000040
o32[2].o32_vsize: 000000A0
o32[2].o32_rva: 00003000
o32[2].o32_psize: 000000A0
o32[2].o32_dataptr: P+00084000
o32[2].o32_realaddr: P+00084000
o32[2].o32_flags: 40000040
(5)我们再用WINHEX打开imageinfo.bin
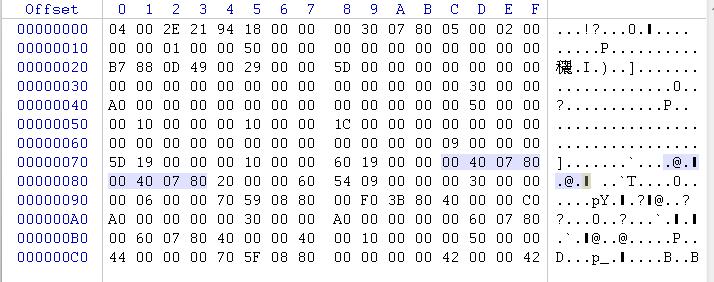
原本region_0的地址是80076000,在十六进制编辑器里地址是倒过来的,每个字节是两位数,因此80 07 60 00应该是显示00 60 07 80才对,我们可以发现7C的地址就是o32[0].o32_dataptr的数值地址,80的地址是o32[0].o32_realaddr的地址,AC的地址是o32[2].o32_dataptr,B0的地址是o32[2].o32_realaddr的地址,因此我们将那里的数值都修改吧,修改后如下:
二十一、接着就到osaxst0.dll,因为hd.dll的o32 region_2大小(长度)是a0,小于2000,因此osaxst0.dll的o32 region_0起始地址是80084000+2000=80086000,而osaxst0.dll的o32 region_0大小是96e4,取整数是A000,因此o32 region_2的起始地址是80086000+A000=80090000
(1)我们先打开imageinfo.txt吧:
o32[0].o32_vsize: 000096E4
o32[0].o32_rva: 00001000
o32[0].o32_psize: 000096E4
o32[0].o32_dataptr: P+00078000
o32[0].o32_realaddr: P+00078000
o32[0].o32_flags: 60000020
o32[1].o32_vsize: 00003378
o32[1].o32_rva: 0000B000
o32[1].o32_psize: 00000A00
o32[1].o32_dataptr: P+000BB254
o32[1].o32_realaddr: P+003EB000
o32[1].o32_flags: C0000040
o32[2].o32_vsize: 000002E8
o32[2].o32_rva: 0000B000
o32[2].o32_psize: 000002E8
o32[2].o32_dataptr: P+00082000
o32[2].o32_realaddr: P+00082000
o32[2].o32_flags: 40000040
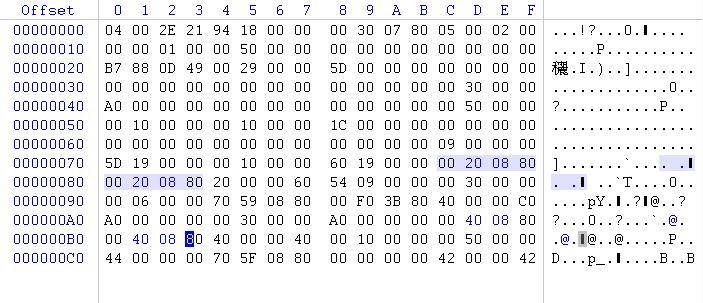
(2)同上,将o32[0].o32_dataptr和o32[0].o32_realaddr由P+00078000修改成P+00086000,o32[2].o32_dataptr和o32[2].o32_realaddr由P+00082000修改成P+00090000,修改后如下:
o32[0].o32_vsize: 000096E4
o32[0].o32_rva: 00001000
o32[0].o32_psize: 000096E4
o32[0].o32_dataptr: P+00086000
o32[0].o32_realaddr: P+00086000
o32[0].o32_flags: 60000020
o32[1].o32_vsize: 00003378
o32[1].o32_rva: 0000B000
o32[1].o32_psize: 00000A00
o32[1].o32_dataptr: P+000BB254
o32[1].o32_realaddr: P+003EB000
o32[1].o32_flags: C0000040
o32[2].o32_vsize: 000002E8
o32[2].o32_rva: 0000B000
o32[2].o32_psize: 000002E8
o32[2].o32_dataptr: P+00090000
o32[2].o32_realaddr: P+00090000
o32[2].o32_flags: 40000040
(3)同上用WINHEX修改imageinfo.bin吧
二十二、冲突处理完毕~我们用xipport.exe realloc p再write maps看看吧~
二十三、已经搜索不到!!!了~原本冲突的地方如下:
80000000 – 80000000 L00000000 Start: first physical address
80000000 – 80001000 L00001000 RomLDR.PARTHDR
80001000 – 8007d5f4 L0007c5f4 o32 region_0 rva=00001000 vsize=0007c5f4 real=80001000 psize=0007c5f4 f=60000020 for nk.exe
8007d5f4 – 8007e000 L00000a0c NUL
8007e000 – 80081238 L00003238 o32 region_3 rva=0007e000 vsize=00003238 real=8007e000 psize=00003238 f=40000040 for nk.exe
80081238 – 80082000 L00000dc8 NUL
80082000 – 8008395d L0000195d o32 region_0 rva=00001000 vsize=0000195d real=80082000 psize=00001960 f=60000020 for hd.dll
8008395d – 80084000 L000006a3 NUL
80084000 – 800840a0 L000000a0 o32 region_2 rva=00003000 vsize=000000a0 real=80084000 psize=000000a0 f=40000040 for hd.dll
800840a0 – 80086000 L00001f60 NUL
80086000 – 8008f6e4 L000096e4 o32 region_0 rva=00001000 vsize=000096e4 real=80086000 psize=000096e4 f=60000020 for osaxst0.dll
8008f6e4 – 80090000 L0000091c NUL
80090000 – 800902e8 L000002e8 o32 region_2 rva=0000b000 vsize=000002e8 real=80090000 psize=000002e8 f=40000040 for osaxst0.dll
800902e8 – 80093000 L00002d18 NUL
80093000 – 8009d775 L0000a775 o32 region_0 rva=00001000 vsize=0000a775 real=80093000 psize=0000a778 f=60000020 for kd.dll
8009d775 – 8009e000 L0000088b NUL
8009e000 – 8009e398 L00000398 o32 region_2 rva=0000c000 vsize=00000398 real=8009e000 psize=00000398 f=40000040 for kd.dll
8009e398 – 800a0000 L00001c68 NUL
800a0000 – 800a2ee4 L00002ee4 o32 region_0 rva=00001000 vsize=00002ee4 real=800a0000 psize=00002ee4 f=60000020 for osaxst1.dll
800a2ee4 – 800a3000 L0000011c NUL
800a3000 – 800a3148 L00000148 o32 region_2 rva=00004000 vsize=00000148 real=800a3000 psize=00000148 f=40000040 for osaxst1.dll
800a3148 – 800a4000 L00000eb8 NUL
800a4000 – 800a696d L0000296d o32 region_0 rva=00001000 vsize=0000296d real=03ffb000 psize=00002970 f=60000020 for busenum.dll
二十四、我们再接着处理RAM里的模块吧,看看MAP最后的地址:
80477114 – 8047aab9 L000039a5 filedata sysroots.p7b
8047aabc – 8047be8a L000013ce filedata e163825b-6e7b-b284-7373-da8c33ae39cd.dsm
8047be8a – 80577e8c L000fc002 NUL
80577e8c – 80577e8c L00000000 End: highest physical address
80577e8c – 80578000 L00000174 NUL
80578000 – 80578000 L00000000 Start: start of RAM
80578000 – 80617000 L0009f000 NUL
80617000 – 80617000 L00000000 —— start of RAM free space
80617000 – 83400000 L02de9000 NUL
83400000 – 83400000 L00000000 End: end of RAM
二十五、可以看到到highest physical address到8047be8a就没有模块了,因此physlast的地址就是这个才合理,不过官方一般会+2做为physlast地址的,因此我们也依照官方,将physlast的地址改为8047be8c吧,我们打开ROMHDR.txt,将physlast的地址改为8047be8c,而ulRAMStart为physlast最小的1000倍(即千位数加1,后面为0),所以ulRAMStart为8047c000,我们一样修改吧,修改后再用xipport realloc p、write maps看看
二十六、现在map.txt的后面变成这样了:
8047aabc – 8047be8a L000013ce filedata e163825b-6e7b-b284-7373-da8c33ae39cd.dsm
8047be8c – 8047be8c L00000000 End: highest physical address
8047be8c – 8047c000 L00000174 NUL
8047c000 – 8047c000 L00000000 Start: start of RAM
8047c000 – 8047d000 L00001000 NUL
8047d000 – 8047e000 L00001000 initialized data of region_1 osaxst1.dll
8047e000 – 80480000 L00002000 NUL
80480000 – 80486000 L00006000 uninitialized data of region_1 nk.exe
80486000 – 80504000 L0007e000 initialized data of region_2 nk.exe
80504000 – 80517000 L00013000 initialized data of region_1 kd.dll
80517000 – 80617000 L00100000 NUL
80617000 – 80617000 L00000000 —— start of RAM free space
80617000 – 83400000 L02de9000 NUL
83400000 – 83400000 L00000000 End: end of RAM
我们可以对比19971的map.txt看看:
80476abc – 80477e8a L000013ce filedata e163825b-6e7b-b284-7373-da8c33ae39cd.dsm
80477e8c – 80477e8c L00000000 End: highest physical address
80477e8c – 80478000 L00000174 NUL
80478000 – 80478000 L00000000 Start: start of RAM
80478000 – 80479000 L00001000 initialized data of region_1 hd.dll
80479000 – 8047d000 L00004000 initialized data of region_1 osaxst0.dll
8047d000 – 8047e000 L00001000 initialized data of region_1 osaxst1.dll
8047e000 – 80480000 L00002000 NUL
80480000 – 80486000 L00006000 uninitialized data of region_1 nk.exe
80486000 – 80504000 L0007e000 initialized data of region_2 nk.exe
80504000 – 80517000 L00013000 initialized data of region_1 kd.dll
80517000 – 80517000 L00000000 —— start of RAM free space
80517000 – 83400000 L02ee9000 NUL
83400000 – 83400000 L00000000 End: end of RAM
二十七、可以发现region_1 hd.dll和region_1 osaxst0.dll消失了,我们要把这两个加回来才可以(以下简单说明,如果不清楚请看第二篇替换wince.nls的教程)
二十八、NK之间的地址是4000,而region_1 osaxst0.dll的大小刚好是4000,为了不浪费内存,我们将region_1 osaxst0.dll放在NK的前面,再将region_1 hd.dll和region_1 osaxst1.dll放在后面吧
1、进入osaxst0.dll目录,打开imageinfo.txt,将o32[1].o32_realaddr: P+003EB000改成o32[1].o32_realaddr: P+0047c000,然后将imageinfo.bin里98地址的的00b0e380改成00c04780
2、进入hd.dll目录,打开imageinfo.txt,将o32[1].o32_realaddr: P+003BF000改成o32[1].o32_realaddr: P+00517000,然后将imageinfo.bin里98地址的的00f03b80改成00705180
3、进入osaxst1.dll目录,打开imageinfo.txt,将o32[1].o32_realaddr: R=8047D000改成o32[1].o32_realaddr: P+00518000,然后将imageinfo.bin里98地址的的00d04780改成00805180
二十九、再用xipport.exe realloc p、write maps,看看最后:
8047c000 – 8047c000 L00000000 Start: start of RAM
8047c000 – 80480000 L00004000 initialized data of region_1 osaxst0.dll
80480000 – 80486000 L00006000 uninitialized data of region_1 nk.exe
80486000 – 80504000 L0007e000 initialized data of region_2 nk.exe
80504000 – 80517000 L00013000 initialized data of region_1 kd.dll
80517000 – 80518000 L00001000 initialized data of region_1 hd.dll
80518000 – 80519000 L00001000 initialized data of region_1 osaxst1.dll
80519000 – 80617000 L000fe000 NUL
80617000 – 80617000 L00000000 —— start of RAM free space
80617000 – 83400000 L02de9000 NUL
83400000 – 83400000 L00000000 End: end of RAM
三十、OK,那些DLL都回来了,然后我们还要最后一步处理,就是修改ulRAMFree,我们可以从上面看到,RAM区最后到80519000时后面的地址都是空余的,因此ulRAMFree最后修改成80519000,打开romhdr.txt,将ulRAMFree:80617000改成80519000,然后保存退出,再用xipport.exe realloc p、write maps,看看最后:
8047c000 – 8047c000 L00000000 Start: start of RAM
8047c000 – 80480000 L00004000 initialized data of region_1 osaxst0.dll
80480000 – 80486000 L00006000 uninitialized data of region_1 nk.exe
80486000 – 80504000 L0007e000 initialized data of region_2 nk.exe
80504000 – 80517000 L00013000 initialized data of region_1 kd.dll
80517000 – 80518000 L00001000 initialized data of region_1 hd.dll
80518000 – 80519000 L00001000 initialized data of region_1 osaxst1.dll
80519000 – 80519000 L00000000 —— start of RAM free space
80519000 – 83400000 L02ee7000 NUL
83400000 – 83400000 L00000000 End: end of RAM
三十一、OK~~~已经完美了~~~~
三十二、有些教程写着还要修改NK里s000的rom_00,这个事实只是跨版本移植才需要修改的,如6.0移植6.1的,这里我们就不修改了。
三十三、点击build xip_out.bin吧,然后导入XIP刷机验证一下吧~本教程到时结束,谢谢~
三十四、其实也可以使用XIPAddrTools.exe来修改,不过我试过用这个软件修改后ddi.dll里有些地址会被改乱,在里面显示是fffffffff来的……(谢谢火山口提醒)因此这里就不用这个软件了
总结几点吧:
1、移植XIP只需将要移植的XIP里的MSXIP开头的目录复制到原XIP相应的目录
2、End: last DLL address后面的模块地址调整要用mreloc.exe修改及修改相应的imageinfo.txt(死了几十次的经验,呵呵)
3、Start: first physical address后面的模块只需修改imageinfo.txt和imageinfo.bin(事实上我试过imageinfo.bin不修改也能成功)
4、RAM区有时会挤掉一些DLL,要按原MAP加回来(修改imageinfo.txt和imageinfo.bin)
5、上次替换WINCE的教程已经说过了,ulRAMStart为physlast的最小1000倍(即physlast的千位加1,后面为0),NK的地址为ulRAMStart的最小10000倍(即万位加1,后面为0)。NK要用M’Reloc_nk.exe再修改imageinfo.txt。(事实上NK很特殊的,有些XIP的NK不按这种规律,有些XIP甚至根本不能移动地址,否则肯定死掉……)
最后感谢老麦、fjzhang、网络上的各种教程~有空再写写用XIPAddrTools.exe移植的方法吧(事实这个软件是傻瓜软件,所以很大可能我不会写的,呵呵)